This is also nice menu-bar for blogger.It has more nice hover and im using just CSS and HTML for this bar.You can increase bar width with adding more links. you can check my earlier menu-bar post
post by clicking here
 Demo
Demo
1. Log in to blogger account and Click drop down.
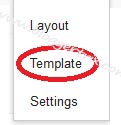
 2. Now select "Template" Like Below.
3. Now you can see Live on blog, Click EDIT HTML Button"
4. Now click Proceed button.
2. Find this tag by using Ctrl+F ]]></b:skin>
3. Paste below code Before ]]></b:skin> tag
4. Go to blogger and click Layout
5. Click Add Gadget and select 'HTML/Javascript
6. Paste below code.
Replace with your links.
7. Now save your HTML/Javascript'.
You are done...
Read More
post by clicking here
3. Now you can see Live on blog, Click EDIT HTML Button"
4. Now click Proceed button.
2. Find this tag by using Ctrl+F ]]></b:skin>
3. Paste below code Before ]]></b:skin> tag
#menu2{
 width:90%;
 margin:25px auto;
}
#menu2 ul{
 list-style:none;
}
#menu2 li{
 display:block;
 float:left;
}
#menu2 li a{
 background:#979797 url(https://blogger.googleusercontent.com/img/b/R29vZ2xl/AVvXsEiaGJQKhYvtZJWecoQjgQ5d6So3K1WwvCwZJXbDVs1629qOmLce7mKAp7e-Aj7rhZDI0k4Rt7QHLZOy6f86CzSGU0CmFIuuIhDCIsr9-ZXWbcMpjXsvQ2Fc9WFDwldv633Yp2jAiZJQfG8n/s1600/menu_bg.gif) repeat-x;
 border:2px solid #939393;
 margin:0 1px;
 padding:15px 15px 15px 15px;
 display:block;
 float:left;
 color:#fff;
 text-transform:uppercase;
 text-decoration:none;
 font-family:Geneva, Arial, Helvetica, sans-serif;
 font-size:13px;
 font-weight:bold;
 height: 50px;
}
#menu2 li a span{
 color:#636363;
 font-size:10px;
 text-transform:lowercase;
 font-family:Geneva, Arial, Helvetica, sans-serif;
 font-weight:normal;
}
#menu2 li a:hover{
 background:#e46825 url(https://blogger.googleusercontent.com/img/b/R29vZ2xl/AVvXsEhN73vFDPHHv2OHM_EcT5Vo-QQ6mYDbpKW6S5oQV1DnnXQ7O1z30c1dlWo2MP1GE3ck2WwtDQDqda8VQ0NzNuhDl71jZfAMaga1k0z2ZZ5wDQR0tjUpE1V5N6C4ucVhaWtvdCh9atpB3_Ab/s1600/menu_hover.gif) repeat-x;
 border:2px solid #939393;
 text-decoration:none;
}
#menu2 li a:hover span{
 color:#636363;
}
.current{
 background:#bcbcbc url(https://blogger.googleusercontent.com/img/b/R29vZ2xl/AVvXsEhN73vFDPHHv2OHM_EcT5Vo-QQ6mYDbpKW6S5oQV1DnnXQ7O1z30c1dlWo2MP1GE3ck2WwtDQDqda8VQ0NzNuhDl71jZfAMaga1k0z2ZZ5wDQR0tjUpE1V5N6C4ucVhaWtvdCh9atpB3_Ab/s1600/menu_hover.gif) repeat-x;
 border:2px solid #aeaeae;
 margin:0 1px;
 padding:15px 15px 15px 15px;
 display:block;
 float:left;
 color:#fff;
 text-transform:uppercase;
 text-decoration:none;
 font-family:Geneva, Arial, Helvetica, sans-serif;
 font-size:13px;
 cursor:pointer;
 font-weight:bold;
 height: 50px;
}
.current span{
 color:#636363;
 font-size:10px;
 text-transform:lowercase;
 font-family:Geneva, Arial, Helvetica, sans-serif;
 font-weight:normal;
}
4. Go to blogger and click Layout
5. Click Add Gadget and select 'HTML/Javascript
6. Paste below code.
<!--MenuBar Starts-->
<div id="menu2">
 <ul>
  <li class="current">Home<br /><span>takes you to<br /> home page</span></li>
  <li><a href="#">About Us<br /><span>takes you to<br />about us page</span></a></li>
  <li><a href="#">Products<br /><span>takes you to<br />products page</span></a></li>
  <li><a href="#">Partners<br /><span>takes you to<br />partners page</span></a></li>
  <li><a href="#">Contact Us<br /><span>takes you to<br />contact page</span></a></li></ul>
</div><!--MenuBar Ends--
Replace with your links.
7. Now save your HTML/Javascript'.
You are done...