
Most of bloggers are using custom blogger contact form. For that they used third party site to get work done. It is bit complex work for beginners. Blogger launched new blogger contact form. So, this official blogger contact form and they provide stranded User interface your this new blogger widget. Therefore we have to apply new css style to make it looks nice.
Blogger contact form is very important because every visitors can contact administrator easily.So, you don't want to share your main email address directly with your blog.
1. This is the best widget for away from third party blogger contact forms.
2. This widget developed by blogger and you can trust them than third party blogger contact us forms
3. Blogger Contact us form helps to contact administrator of the blog for some questions,Some business through this. So, this is very excellent way to get connected.
4. Blogger administrator get message immediately to his inbox.
5.If your blog provide some services, visitors can request service or information thought this blogger contact form.
Before adding this blogger contact form widget. you have to activate it and apply on slidebar
1. Go to blogger.com and sign in first
2. In blogger Dashboard Click Layout on Left side bar
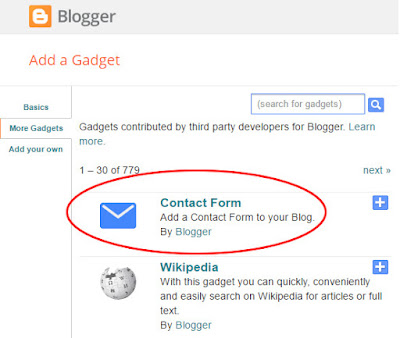
3. Click on ad Add Gadget (any add gadget where you want to add) and select Contact Us From
4. Now you can save it.
For now, you are successfully added contact form for blogger. Now you need to style your blogger contact form.
1. In Blogger Dashboard Click on Template
2. Now click on Edit HTML and Search ]]></b:skin> By (Ctrl + F)
3. Now Paste below code before ]]></b:skin>
Your Blogger contact form looks like below

You can add this blogger contact form to static page in blogger.This is easy to add to blogger and you can make it as a contact form page. follow these guideline.
1. In Blogger Dashboard Click on Template
2. Now click on Edit HTML and Search id="ContactForm" By (Ctrl + F)

3. Now you can see a code like below.
4. Now just remove the code which i mention with red color
5. Click Save Template button and save your template
6. Now click Pages on blogger dashboard and Click New Page and create a new page
7. Now switch in to HTML composer on left and paste below code.
If you want, you can copy this page link and connect with your Menu bar, Then users easy to get connect with this blogger contact form.
Read more: How to add widget for blogger
This message will send to email address which you registered with blogger. If you have any request ion regarding to this add blogger contact form for blogger.
Blogger contact form is very important because every visitors can contact administrator easily.So, you don't want to share your main email address directly with your blog.
Why you should use a blogger contact form
1. This is the best widget for away from third party blogger contact forms.
2. This widget developed by blogger and you can trust them than third party blogger contact us forms
3. Blogger Contact us form helps to contact administrator of the blog for some questions,Some business through this. So, this is very excellent way to get connected.
4. Blogger administrator get message immediately to his inbox.
5.If your blog provide some services, visitors can request service or information thought this blogger contact form.
How to add blogger Contact Form for Blogger widget
Before adding this blogger contact form widget. you have to activate it and apply on slidebar
1. Go to blogger.com and sign in first
2. In blogger Dashboard Click Layout on Left side bar
3. Click on ad Add Gadget (any add gadget where you want to add) and select Contact Us From

4. Now you can save it.
For now, you are successfully added contact form for blogger. Now you need to style your blogger contact form.
How to Add styles to Contact Form For Blogger
1. In Blogger Dashboard Click on Template
2. Now click on Edit HTML and Search ]]></b:skin> By (Ctrl + F)
3. Now Paste below code before ]]></b:skin>
/* Contact Form Container www.bloggertrix.com*/4: Now Save your template. You are successfully done for now.
.contact-form-widget {
width: 500px;
max-width: 100%;
margin: 0 auto;
padding: 10px;
background: #F8F8F8;
color: #000;
border: 1px solid #C1C1C1;
box-shadow: 0 1px 4px rgba(0, 0, 0, 0.25);
border-radius: 10px;
}
/* Fields and submit button */
.contact-form-name, .contact-form-email, .contact-form-email-message {
width: 100%;
max-width: 100%;
margin-bottom: 10px;
}
/* Submit button style */
.contact-form-button-submit {
border-color: #C1C1C1;
background: #E3E3E3;
color: #585858;
width: 20%;
max-width: 20%;
margin-bottom: 10px;
}
/* Submit button on mouseover www.bloggertrix.com */
.contact-form-button-submit:hover{
background: #4C8EF9;
color: #ffffff;
border: 1px solid #FAFAFA;
}
Your Blogger contact form looks like below

How To Add Contact Form for Blogger Static Pages
You can add this blogger contact form to static page in blogger.This is easy to add to blogger and you can make it as a contact form page. follow these guideline.
1. In Blogger Dashboard Click on Template
2. Now click on Edit HTML and Search id="ContactForm" By (Ctrl + F)
3. Now you can see a code like below.
<b:widget id='ContactForm1' locked='false' title='Contact Form' type='ContactForm'>
<b:includable id='main'>
<b:if cond='data:title != ""'>
<h2 class='title'><data:title/></h2>
</b:if>
<div class='contact-form-widget'>
<div class='form'>
<form name='contact-form'>
<p/>
<data:contactFormNameMsg/>
<br/>
<input class='contact-form-name' expr:id='data:widget.instanceId + "_contact-form-name"' name='name' size='30' type='text' value=''/>
<p/>
<data:contactFormEmailMsg/> <span style='font-weight: bolder;'>*</span>
<br/>
<input class='contact-form-email' expr:id='data:widget.instanceId + "_contact-form-email"' name='email' size='30' type='text' value=''/>
<p/>
<data:contactFormMessageMsg/> <span style='font-weight: bolder;'>*</span>
<br/>
<textarea class='contact-form-email-message' cols='25' expr:id='data:widget.instanceId + "_contact-form-email-message"' name='email-message' rows='5'/>
<p/>
<input class='contact-form-button contact-form-button-submit' expr:id='data:widget.instanceId + "_contact-form-submit"' expr:value='data:contactFormSendMsg' type='button'/>
<p/>
<div style='text-align: center; max-width: 222px; width: 100%'>
<p class='contact-form-error-message' expr:id='data:widget.instanceId + "_contact-form-error-message"'/>
<p class='contact-form-success-message' expr:id='data:widget.instanceId + "_contact-form-success-message"'/>
</div>
</form>
</div>
</div>
<b:include name='quickedit'/>
</b:includable>
</b:widget>
4. Now just remove the code which i mention with red color
5. Click Save Template button and save your template
6. Now click Pages on blogger dashboard and Click New Page and create a new page
7. Now switch in to HTML composer on left and paste below code.
<div class="widget ContactForm" id="ContactForm1">8. Now publish your page and you are done.
<div class="contact-form-widget">
<div class="form">
<form name="contact-form">
Name<br />
<input class="contact-form-name" id="ContactForm1_contact-form-name" name="name" size="30" type="text" value="" />
<br />
E-mail *<br />
<input class="contact-form-email" id="ContactForm1_contact-form-email" name="email" size="30" type="text" value="" />
<br />
Message *<br />
<textarea class="contact-form-email-message" cols="25" id="ContactForm1_contact-form-email-message" name="email-message" rows="5"></textarea>
<input class="contact-form-button contact-form-button-submit" id="ContactForm1_contact-form-submit" type="button" value="Submit" />
<br />
<div class="contact-form-error-message" id="ContactForm1_contact-form-error-message">
</div>
<div class="contact-form-success-message" id="ContactForm1_contact-form-success-message">
</div>
</form>
</div>
</div>
</div>
If you want, you can copy this page link and connect with your Menu bar, Then users easy to get connect with this blogger contact form.
Read more: How to add widget for blogger
This message will send to email address which you registered with blogger. If you have any request ion regarding to this add blogger contact form for blogger.


Hi,
ReplyDeletefrom your post i got technical kind of information for how to attract the customer via the internet and through the internet application how to serve valuable things. it makes easier and very helpful.
thanks,
PTE Coaching in Chennai
Thank you for sharing this wonderful information. In this post give good explanation in detail that helps people.It's great post.
ReplyDelete