
Instagram is a most popular picture and photo sharing network application for smartphones.It's also belong to social networking platform like Facebook, Twitter, and Flicker.You can register as a user in Instagram. When you post a photo or video on Instagram, It will display on your profile.So, others can follow you, like on your photos and comment on photos.Same thing also you can do, comment and like other photos. In instagram, there are 200 millions active users use a month.
Read: Best blogger Widgets 2017 for Blogger
Adding Instagram widget to blogger, you can get more facilities to your blog. Because it will show your photos in profile pages. When ever you go some where else, you can take a photo and share it on Instagram. There are more filters you can add to photos. This Instagram widget, specially design for blogger and it will show your images on blogger even they are not your follower.
 By adding this Instagram widget for blogger ,You can increase your follower. Once they visit your blog and if your shared photos are interesting, they will follow you. And you have to share photos according to your blog content,for example if you doing food making blog, you can share about foods.It will easy to get more followers in Instagram.
Today, this article will explain, how to add Instagram widget to your blog site with step by step. By using this blogger widget you can customize Instagram widget appearance like background color, font color and how to show this widget on blogger.So just follow below steps.
1: You need to visit this site to get Instagram widget http://www.intagme.com/
2: Type Instagram username first
3: You can choose slideshow as Widget type
4: Thumbnail Size 100
5: You can select Photo Border If you want a border to photos
6: You can choose Background Color match to your template color with color picker
7: If you want to add sharing button select Yes
 Note: Once yo done, click preview and check your Instagram widget appearance.
8: Once you are done click Get Code and copy it.
9: Now just login to your blogger account https://www.blogger.com
10: Go to layout on left side bar on blogger dashboard
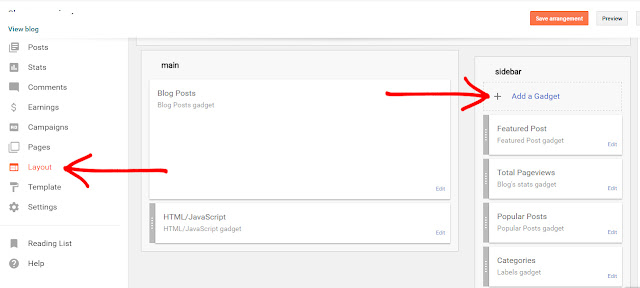
11: Click Add Gadget, Select HTML/JavaScript gadget on popup window.

12: Paste the instagram widget code that you copied from intagme website and click Save
 13: Now you can drag the widget where you want to keep and click Save Arrangement
You are done
Read: Best Blogger Gadgets 2017 for Blogger
Once you added Instagram widget to blogger, you can ask your visitors to follow you. Before do it, just make sure to add few photos to your profile and profile photos as well.Then they will get trust about you profile and follow you.
If you have a question about this Instagram widget for blogger gadget, You can comment below. If this article helps you, just spend moment share with Facebook twitter and follow us on Facebook and Twitter
Read More
Read: Best blogger Widgets 2017 for Blogger
Adding Instagram widget to blogger, you can get more facilities to your blog. Because it will show your photos in profile pages. When ever you go some where else, you can take a photo and share it on Instagram. There are more filters you can add to photos. This Instagram widget, specially design for blogger and it will show your images on blogger even they are not your follower.

Today, this article will explain, how to add Instagram widget to your blog site with step by step. By using this blogger widget you can customize Instagram widget appearance like background color, font color and how to show this widget on blogger.So just follow below steps.
How to Add An Instagram Widget in Blogger
1: You need to visit this site to get Instagram widget http://www.intagme.com/
2: Type Instagram username first
3: You can choose slideshow as Widget type
4: Thumbnail Size 100
5: You can select Photo Border If you want a border to photos
6: You can choose Background Color match to your template color with color picker
7: If you want to add sharing button select Yes

8: Once you are done click Get Code and copy it.
9: Now just login to your blogger account https://www.blogger.com
10: Go to layout on left side bar on blogger dashboard

11: Click Add Gadget, Select HTML/JavaScript gadget on popup window.

12: Paste the instagram widget code that you copied from intagme website and click Save

You are done
I hope you added Instagram widget to your blog.Hence, you can share photos and videos as i said above. To change color or appearance of this Instagram widget, you can go that site and edit it as your need.
Read: Best Blogger Gadgets 2017 for Blogger
Once you added Instagram widget to blogger, you can ask your visitors to follow you. Before do it, just make sure to add few photos to your profile and profile photos as well.Then they will get trust about you profile and follow you.
If you have a question about this Instagram widget for blogger gadget, You can comment below. If this article helps you, just spend moment share with Facebook twitter and follow us on Facebook and Twitter


