Saturday, April 30, 2011

How to add stylish Jquery post widget to blogger

How to add stylish Jquery post widget to blogger

blogger,stylish,jquary,blogger tips,widget,post
This is cool widget to your blogger.you can get nice look to your blog.try it.
Click here to  DEMO

1. Log in to your blogger account and Go to Design >> Edit HTML

2. Put checked marked in Expand Widget Templates

3. Find this tag by using Ctrl+F 

4. Paste below code before ]]></b:skin> tag

#featured{
width:336px;
padding-right:250px;
position:relative;
height:250px;
background:#fff;
border:5px solid #ccc;
}
#featured ul.ui-tabs-nav{
    position:absolute;
    top:0; left:336px;
    list-style:none;
    padding:0; margin:0;
    width:250px;
}
#featured ul.ui-tabs-nav li{
    padding:1px 0; padding-left:13px;
    font-size:12px;
    color:#666;
}
#featured ul.ui-tabs-nav li span{
    font-size:11px; font-family:Verdana;
    line-height:18px;
}

#featured .ui-tabs-panel{
    width:336px; height:250px;
    background:#999; position:relative;
        overflow:hidden;
}
#featured .ui-tabs-hide{
    display:none;
}

#featured li.ui-tabs-nav-item a{/*On Hover Style*/
    display:block;
    height:60px;
    color:#333;  background:#fff;
    line-height:20px;
    outline:none;
}
#featured li.ui-tabs-nav-item a:hover{
    background:#f2f2f2;
}
#featured li.ui-tabs-selected{ /*Selected tab style*/
    background:url('https://blogger.googleusercontent.com/img/b/R29vZ2xl/AVvXsEhMkoj57hb4mOMJvM2p7ktj4r0iuQsfNh5SReIEJTCaXEBvJIpFuitBi2M8fTXaAftyVH7c6gscS3Z6ERnpdU_TLdbt95HKYR_dHXqnGXG3xSChtTcjJ5fGO2TD_7Pr2GCdu68qIZlbxJM/s1600/selected-item.gif') top left no-repeat;
}
#featured ul.ui-tabs-nav li.ui-tabs-selected a{
    background:#ccc;
}

#featured ul.ui-tabs-nav li img{
    float:left; margin:2px 5px;
    background:#fff;
    padding:2px;
    border:1px solid #eee;
}
#featured .ui-tabs-panel .info{
    position:absolute;
    top:180px; left:0;
    height:70px; width: 400px;
    background: url('https://blogger.googleusercontent.com/img/b/R29vZ2xl/AVvXsEjr5EU9BqhBcnqCHTiGdtTh7l6wyhjt3UzWy0KFMtCNcilO3EIawyWyWdWoCd8Ck38KrSpFyqdoJ0_DaEepM-cItcuNXKceealPEs7pgeKSDsNQ4wxbEkWA_RPKBF6jZX3BfPbVPtRhuUE/s1600/transparent-bg.png');
}
#featured .info h2{
    font-size:18px; font-family:Georgia, serif;
    color:#fff; padding:5px; margin:0;
    overflow:hidden;
}
#featured .info p{
    margin:0 5px;
    font-family:Verdana; font-size:11px;
    line-height:15px; color:#f0f0f0;
}
#featured .info a{
    text-decoration:none;
    color:#fff;
}
#featured .info a:hover{
    text-decoration:underline;
}

.ui-tabs-nav-item img {
width:45px;
height:45px;
}

5. Now find  </head> tag

6. Paste below code before </head> tag

<script src='http://ajax.googleapis.com/ajax/libs/jquery/1.3.2/jquery.min.js' type='text/javascript'/>

<script src='http://ajax.googleapis.com/ajax/libs/jqueryui/1.5.3/jquery-ui.min.js' type='text/javascript'/>

<script type='text/javascript'>

    $(document).ready(function(){

        $(&quot;#featured &gt; ul&quot;).tabs({fx:{opacity: 
&quot;toggle&quot;}}).tabs(&quot;rotate&quot;, 5000, 
true);

    });

</script>

7. Go to Design >> Page Element

8. Click Add Gadget and select 'HTML/Javascript'

9. Paste below one of below code.

<div id="featured">

          <ul class="ui-tabs-nav">
            <li class="ui-tabs-nav-item ui-tabs-selected">
<a href="#fragment-1">
<img alt="" src="https://blogger.googleusercontent.com/img/b/R29vZ2xl/AVvXsEiXZeZujgWT3_k8cCxp3ZJPg8XUvsHOao_KtPqn9VygPc2zgN3QCaa3cZyXIQFSTjDoJ3BzgDcNi6dv7UtnAVCntvxQDDZs8Jxg37WtX0cHjjE33FhXdCVjoZGwwP5IuOdYneXR95JiuuS0/s320/bloggertrix.1.jpg" />
<span>Cool nature</span></a></li>

            <li class="ui-tabs-nav-item">
<a href="#fragment-2">
<img alt="" src="https://blogger.googleusercontent.com/img/b/R29vZ2xl/AVvXsEjI_EJODdkvUkJdFvPJEOmEvIE3-kD7vbMIv1WjmOu55kg-Z0ivH1t7faJAtldJJ768swzTiIVH6M69M9ir5Bx428Ycck4jmKH_OT0ZHS9aeu8CYpVvY3Vws6DJXxkPI-8sKaqMPyqlXpJN/s320/bloggertrix.2.jpg" />
<span>Fresh  Fruit</span></a></li>

            <li class="ui-tabs-nav-item">
<a href="#fragment-3"><img alt="" src="https://blogger.googleusercontent.com/img/b/R29vZ2xl/AVvXsEjIIyyTvaIXsu3MjtC1LTMaaUKEiBkEVrOumn68vzTLp4x4N6PdHctp_idJajjQLACvOCOlASEMcwXB77DFGCLzahnx7wABa3ozW-2ilNff2i0kiFRkmuK6YPkS0CupWvLnuw0Zz57Yb-Rl/s320/bloggertrix.5.jpg" /><span>Foods</span></a></li>

            <li id="nav-fragment-4" class="ui-tabs-nav-item">
<a href="#fragment-4">
<img alt="" src="https://blogger.googleusercontent.com/img/b/R29vZ2xl/AVvXsEj2O8Y2tL0mAMDaztpOWMuoUp_XcpHPArxU4oFRTWewAiwE6-y16C27rHjvqir5djM5oeCo59ddWDlb67x_Qq6yxh7XhyH7bGSnZHF3SbOJz-qTXI5giOoeC656WLQqeH0Ax1_n9OZ9v3Pm/s320/bloggertrix.4.JPG" />
<span>Amzing nature</span></a></li>
          </ul>

        <!-- First Content -->
        <div id="fragment-1" style="" class="ui-tabs-panel">
            <img alt="" src="https://blogger.googleusercontent.com/img/b/R29vZ2xl/AVvXsEiXZeZujgWT3_k8cCxp3ZJPg8XUvsHOao_KtPqn9VygPc2zgN3QCaa3cZyXIQFSTjDoJ3BzgDcNi6dv7UtnAVCntvxQDDZs8Jxg37WtX0cHjjE33FhXdCVjoZGwwP5IuOdYneXR95JiuuS0/s320/bloggertrix.1.jpg" />

             <div class="info">
                <h2><a href="#fragment-1">Cool nature</a></h2>
                <p>Lorem ipsum dolor sit amet, consectetur adipiscing elit. Nulla tincidunt condimentum lacus. Pellentesque ut diam....<a href="#">Read more</a></p>
             </div>
        </div>

        <!-- Second Content -->
        <div id="fragment-2" style="" class="ui-tabs-panel">
            <img alt="" src="https://blogger.googleusercontent.com/img/b/R29vZ2xl/AVvXsEjI_EJODdkvUkJdFvPJEOmEvIE3-kD7vbMIv1WjmOu55kg-Z0ivH1t7faJAtldJJ768swzTiIVH6M69M9ir5Bx428Ycck4jmKH_OT0ZHS9aeu8CYpVvY3Vws6DJXxkPI-8sKaqMPyqlXpJN/s320/bloggertrix.2.jpg" />

             <div class="info">
                <h2><a href="#fragment-2">Fresh fruit</a></h2>
                <p>Vestibulum leo quam, accumsan nec porttitor a, euismod ac tortor. Sed ipsum lorem, sagittis non egestas id, suscipit....<a href="#">Read more</a></p>
             </div>
        </div>

        <!-- Third Content -->
        <div id="fragment-3" style="" class="ui-tabs-panel">
            <img alt="" src="https://blogger.googleusercontent.com/img/b/R29vZ2xl/AVvXsEiXZeZujgWT3_k8cCxp3ZJPg8XUvsHOao_KtPqn9VygPc2zgN3QCaa3cZyXIQFSTjDoJ3BzgDcNi6dv7UtnAVCntvxQDDZs8Jxg37WtX0cHjjE33FhXdCVjoZGwwP5IuOdYneXR95JiuuS0/s320/bloggertrix.1.jpg" />

             <div class="info">
                <h2><a href="#fragment-3">Foods</a></h2>
                <p>liquam erat volutpat. Proin id volutpat nisi. Nulla facilisi. Curabitur facilisis sollicitudin ornare....<a href="#">Read more</a></p>
             </div>
        </div>

        <!-- Fourth Content -->
        <div id="fragment-4" style="" class="ui-tabs-panel ui-tabs-hide">
            <img alt="" src="https://blogger.googleusercontent.com/img/b/R29vZ2xl/AVvXsEj2O8Y2tL0mAMDaztpOWMuoUp_XcpHPArxU4oFRTWewAiwE6-y16C27rHjvqir5djM5oeCo59ddWDlb67x_Qq6yxh7XhyH7bGSnZHF3SbOJz-qTXI5giOoeC656WLQqeH0Ax1_n9OZ9v3Pm/s320/bloggertrix.4.JPG" />

             <div class="info">
                <h2><a href="#fragment-4">AMzing nature</a></h2>
                <p>Quisque sed orci ut lacus viverra interdum ornare sed est. Donec porta, erat eu pretium luctus, leo augue sodales....<a href="#">Read more</a></p>
             </div></div>
<a href="http://www.bloggertrix.com"><img alt="Best Bloger tricks" src="http://img1.blogblog.com/img/blank.gif"/>
</a></div>

*Replace red URL with your image URL
* If you want you can replace  #fragment-1 to #fragment-4 with your link URL

10. Save it. you are done.
Read More

Friday, April 29, 2011

How to make text area with Hide Button

How to make text area with highlight Button part 2

See below to demo

Bloggertrix :

Type text, or place image here


This will help to one who  want to copy all script without missing any tags

1. Log in to your blogger account and Go to Posting" >> "New Post"

2. you can paste below code  and replace with your text


<div style="margin: 5px 20px 20px;">

<div class="smallfont" style="margin-bottom: 2px;">

<b>Bloggertrix</b> : <input onclick="if 
(this.parentNode.parentNode.getElementsByTagName('div')[1].getElementsByTagName('div')[0].style.display
 != '') { 
this.parentNode.parentNode.getElementsByTagName('div')[1].getElementsByTagName('div')[0].style.display
 = ''; this.innerText = ''; this.value = 'Hide'; } else { 
this.parentNode.parentNode.getElementsByTagName('div')[1].getElementsByTagName('div')[0].style.display
 = 'none'; this.innerText = ''; this.value = 'Show'; }" style="font-size: 11px; margin: 0px; padding: 0px; width: 55px;" type="button" value="Show" /></div>

<div class="alt2" style="border: 1px inset; margin: 0px; padding: 6px;">

<div style="display: none;">

Type text, or place image here
</div></div></div>


Note:  Replace  Show,Hide All with your button name
           Change Bloggertrix as your like
           Replace  Type text, or place image here with your text


3. Done
Read More

Guzel Magazine Template for blogger

Guzel Magazine,template,how to, blogger,theme

 Template Name : Guzel Magazine Template for blogger

 Template Author : www.customthemedesign.com
        
 Designer :    Custom Theme Design

 Basic Instructions : How to install a Blogger template

 Descriptions : 2 Sidebar-2 menu bar-About Arther-categories- blog Achieve -3 columns layout- Navigation Menu- Top Search- RSS, Twitter Widgets- comments- fixed width- Nice header color for contents-Grey background.List-Search-Followers-Useful links


Read More

Thursday, April 28, 2011

How to add Newest Facebook send button to blogger

How to add  Newest Facebook send button to blogger

 This is newest button from blogger. Earlier there was a like
button.Its just like button,we can add any comment on there
.But this button helps you to add comment, like facebook wall.
 try this.This is newest and cool button to your blogger.

facebook, send button, blogger, send, button

You can see DEMO On this site.(under post tile)
Try to click it and share it to your wall.

1. Log in to your blogger account and Go to Design >> Edit HTML

2. Put checked marked in Expand Widget Templates

*If you want to add this to after post header
3. Find this tag by using Ctrl+F  
<div class='post-header-line-1'> or <div class='post-header-line-1'/>


*If you want to add this to post footer
4. Find this tag by using Ctrl+F   <div class='post-footer'>
 
5. After found one of tag, paste below code after above tag.

<div id="fb-root"></div>
<script src="http://connect.facebook.net/en_US/all.js#xfbml=1"></script>
<fb:send expr:href='data:post.url'></fb:send>


6. Now save your template.cheers..you are done.
Read More

Wednesday, April 27, 2011

Add page element Gadget above your blogger header

Add page element Gadget above your blogger header

add gadget,blogger,gadget,blog,how to,blogger tools,blogger tricks
This is very useful to when when trying to put banner ads before your header.some template not including this. so you have to add this gadget.Follow this steps, you can add it to your blogger.


1. Log in to your blogger account and Go to Design >> Edit HTML

2. Put checked marked in Expand Widget Templates

3. Find this tag by using Ctrl+F 

4. Paste below code before ]]></b:skin> tag

#gadget_header{
margin:10px 0;
padding:1%;
width:100%;} 

5. Now find this tag again <div id='header-wrapper'> 

6. Paste below code before above tag
<div id="gadget_header">
<b:section class='header' id='gadgetheader' preferred='yes'/>
</div>  

7.  Now you can add any gadget to before your header.


Good luck.
Read More

Tuesday, April 26, 2011

Add stumbleupon share button with counter for blogger

Add stumbleupon share button with counter for blogger

stumbleupon,blogger,stumble,button,social,bookmark,stumble share,stumbleupon button,stumbler

This gadget help to share your post with stumbleupon.there have few design button.add to your blog.

 Button 1:

<script src="http://www.stumbleupon.com/hostedbadge.php?s=1"></script>

Button 2:

<script src="http://www.stumbleupon.com/hostedbadge.php?s=2"></script>

Button 3:

<script src="http://www.stumbleupon.com/hostedbadge.php?s=3"></script>

Button 4:

<script src="http://www.stumbleupon.com/hostedbadge.php?s=5"></script>

Button 5:

<script src="http://www.stumbleupon.com/hostedbadge.php?s=6"></script>

Button 6:

<script src="http://www.stumbleupon.com/hostedbadge.php?s=4"></script>

Note:
 for example  i took 4th design.you can change
<script src="http://www.stumbleupon.com/hostedbadge.php?s=5"></script>
this code with your design.you can see above designs


1. Log in to your blogger account and Go to Design >> Edit HTML

2. Put checked marked in Expand Widget Templates

3. Find this tag by using Ctrl+F  <data:post.body/>

4. If you want to add this button above your post, paste below code before, <data:post.body/>tag

5. If you want to add this button below your post paste below code after <data:post.body/>   tag

<script src="http://www.stumbleupon.com/hostedbadge.php?s=5"></script>

6. If you want to add it to home page only.delete <data:post.body/> code and paste below code

<b:if cond='data:blog.url ==

data:blog.homepageUrl'>

<data:post.body/>

<script src="http://www.stumbleupon.com/hostedbadge.php?s=5"></script>
</b:if>


7. Now click  preview and click save template button.
   (when you edit template first check it with clicking preview.
  because it help to check is there have error before saving)

8. Good luck . you are done.

Read More

Monday, April 25, 2011

How to add CSS animated hover to blogger

How to add CSS animated hover to blogger

Earlier i made post about How to make image hover
(mouse over button)  i used 2 image for that. But this
is totally different. i used CSS and use 1 image for it.
special thing is you can add description for this.
you can see below image for demo. move your mouse
 to there.lets  see how to make it.


Your text here


1. Log in to your blogger account and Go to Design >> Edit HTML

2. Put checked marked in Expand Widget Templates

3. Find this tag by using Ctrl+F 


4. Paste below code before ]]></b:skin> tag

<!--Start animated hover-->
#image-hover {
}
#figure {
position:relative;
float:left;
margin:10px;
overflow:hidden;
padding: 1px;
}

#figure:hover {
-moz-box-shadow:0 0 20px rgba(0,0,0,0.75);
-webkit-box-shadow:0 0 20px rgba(0,0,0,0.75);
box-shadow:0 0 20px rgba(0,0,0,0.75);
}

#figure .caption {
position:absolute;
bottom:0;
left:0;
opacity: 0.75;
margin-bottom:-115px;
-webkit-transition: margin-bottom;
-webkit-transition-duration: 400ms;
-webkit-transition-timing-function: ease-out;
-moz-transition-property: margin-bottom;
-moz-transition-duration: 400ms;
-moz-transition-timing-function: ease-out;
-o-transition-property: margin-bottom;
-o-transition-duration: 400ms;
transition: margin-bottom;
transition-duration: 400ms;
transition-timing-function: ease-out;
}

#figure:hover .caption {
margin-bottom:0px;
}

#image-hover .caption {
width:100%;
height:90px;
padding:10px;
background:#B1D7F0;
color:#B1D7F0;
font-family: Arial, Helvetica, sans-serif;
}

#image-hover .caption b {
text-shadow: 0px 2px 0px #B1D7F0;
}
#image-hover .caption {
color: #000000;
line-height: 24px;
font-size: 14px;
text-shadow: 0px 2px 0px #000;
}
<!--End animated hover-->

Now you can add this zoom hover for your image for anywhere your blog. ill give a example to do this

5. Click on "Posting" >> "New Post" and  go to Edit HTML

6. Paste below code where you want

<div id="image-hover">
<div id='figure'>
<a href="http://www.bloggertrix.com" target="_blank">
<img src="Image URL"></a>
<span class='caption'>
Your Text here
</span></div></div>

* Replace Image URL with your image URL
* Replace Your Text Here with your text
* Replace http://www.bloggertrix.com your URL
you are done.Good luck.
Read More

Sunday, April 24, 2011

How youtube support to blogger

I got some new feature about blog.But this is not Newest one.
I think most of are don't know about this feature.So i hope to 
share it wit you.How you add you tube Video to your post?? 
In my earlier post i was post about how to Add you tube video
 with Embed.It have more step to do.But using this method 
you can add you tube video instantly.ill show how to do it.
Follow it.

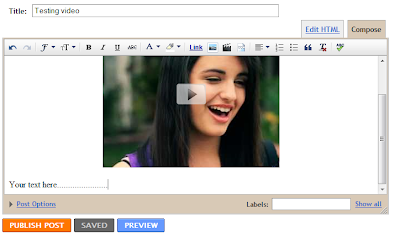
1. Log in to Blogger account and Click New post

2. After that click this button that i mention below image.

bloggertrix,youtube blogger,add youtube video to blogger

3. After click it you will see like this dialog box.

bloggertrix,youtube blogger,add youtube video to blogger

4. After appear this, Click from you tube.(If you have you tube account you can
    click My you tube video and import your videos)

5. Now you can search video what you want from typing search area.

6. After select post what you want and click select.

7. After  we can see post like this.

bloggertrix,youtube blogger,add youtube video to blogger

8. You can add text before video and after video ,like you making post.

I think this will helpful to you. good luck
Read More

Mahusay Blogger Template

Mahusay  Blogger Template


 Template Name : Mahusay  Blogger Template

 Template Author :freebloggertemplate.info
        
 Designer :    free template

 Basic Instructions : How to install a Blogger template

 Descriptions : Slide show-Right  2 Sidebar-About Arther-categories- blog Achieve -3 columns layout- Navigation Menu- Top Search- RSS, Twitter Widgets- comments- fixed width- Nice header color for contents-My Blog -Grey background.List-Search-Followers-Useful links


Read More

Saturday, April 23, 2011

Hex color Generator for Blogger

When Blogging,color is important part,because when we starting
 blogging we have to select the template.
When we choosing template, actually sometime we cant find what
 we want (some color problem). So we have to choose right color
 for our template.when we changing color,when  change it we have
 enter hex color code.(#000000) so we have to find color code.So
 i have color code generate for you.Its easy,You can select your
color first, after you can Get code.If you want to change brightness
,saturation Hue it also include.


I think this will helpful to you. Good luck.
Read More

Friday, April 22, 2011

How to Find broken link on your website

How to Find broken link on your website

If there have more broken link on your site, its not good for
search engine ranking and your visitors also.For example if
you put download link and it will not work,visitors will force
 to other sites.Therefore you have to fix it.So finding broken
link manually is not really easy. some site have thousand of
pages.but now there have software you can use it. you can
check your broken link within 4,5 minutes.Follow steps.

Broken, brokenlink,link,website,find,howto
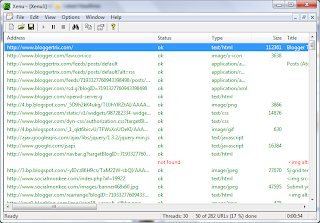
1. Download the software

2. unzip it and install to your computer

3.after run Xenu.exe

4.Now go to left top and click File >> Check URL

5. You can add your site like ( http://www.bloggertrix.com/)

6. Press Ok  after you can see broken link with red color. you can fix it

Good luck
Read More

BoxedTech Blogger Template

BoxedTech Blogger Template


 Template Name : BoxedTech Blogger Template

 Template Author :www.technologytricks.com
        
 Designer :    Technology Tricks

 Basic Instructions : How to install a Blogger template

 Descriptions : Right  2 Sidebar-About me-categories- blog Achieve -3 columns layout- Navigation Menu- Top Search- RSS, Twitter Widgets- comments- fixed width- Nice header color for contents-My Blog -white background.List-Search-Followers-Useful links


Read More

50 Search Engine for submit your website

When we running blog, main thing is traffic. we all are
trying to drive more traffic for our website.so search
engines are more important.because people are get the
 information by searching on search engine.if we submit
 out site to search engine, it will help to drive traffic for
 our site.today i got 50 search engine.you can submit your
 site to there and get more traffic.ill give submit link with
 this, i t will more easy to you.

search engine,seo,seo tips,submit,google,yahoo,bing

1. Google.com      Submit
2. Yahoo.com     Submit
3. Bing.com      Submit 
4. myahint.com      Submit
5. aboveredirect.com      Submit
6. amfibi.com       Submit
7. search-o-rama.com      Submit
8. igwanna.com      Submit
9. ghetosearch.com      Submit
10.  boitho.com      Submit
11. searchramp.com      Submit
12. webportalguide.com      Submit
13. searchbox.info       Submit
14. primesearchresults.com      Submit
15. hiseek.info      Submit
16. hotsitesearch.info      Submit
17. morewebsearch.info      Submit
18.  smartsearchguide.com       Submit
19. findthatwebsite.com       Submit
20.  www.search-blast.info     Submit
21. webportalguide.com        Submit
22. searchitguide.info       Submit
23. findsimilarpages.com       Submit
24. search-blast.info      Submit
25. helpyousearch.info      Submit
26. mysearchpilot.com       Submit
27. theoriginalsearchengine.com      Submit
28.  searchbox.info      Submit
29. fdrsearch.info      Submit
30.  drsearch.info      Submit
31. ineedsearch.info       Submit
32. searchingportal.info       Submit
33. www.localsearchengine.info        Submit
34.searchingguru.info       Submit
35. searchingguru.info       Submit
36. allbestsearch.info      Submit
37. homebusinessdatacenter.com       Submit
38.  bestinternetsearch.info      Submit
39. mouse-click.de      Submit
40.  webmaster-tools.com       Submit
41. dir.guruji.com       Submit
42. websquash.com       Submit
43. fybersearch.com      Submit
44. whatuseek.com      Submit
45. mixcat.com         Submit
46. entireweb.com      Submit
47. scrubtheweb.com        Submit
48.  searchsight.com       Submit
49. sonicrun.com      Submit
50.  acoon.com        Submit

I think this will helpful for you.. good luck.
Read More

Thursday, April 21, 2011

How to make Bubble Effect for blogger image/icons

How to make Bubble Effect for blogger

See below Images for Demo


1. Log in to your blogger account and Go to Design >> Edit HTML

2. Put checked marked in Expand Widget Templates

3. Find this tag by using Ctrl+F 


4. Paste below code before ]]></b:skin> tag


/*URL: http:www.bloggertrix.com */
.bubblewrap{

list-style-type:none;

margin:0;

padding:0;

}


.bubblewrap li{

display:inline;

width: 65px;

height:60px;

}


.bubblewrap li img{

width: 55px; 

height: 60px; 

border:0;

margin-right: 12px; 

-webkit-transition:-webkit-transform 0.1s ease-in; 

-o-transition:-o-transform 0.1s ease-in; 

}


.bubblewrap li img:hover{

-moz-transform:scale(1.8); 

-webkit-transform:scale(1.8);

-o-transform:scale(1.8);

} 

5.Now paste this HTML code where you want to add your images.

/*URL: http:www.bloggertrix.com */<ul class="bubblewrap">

<li><a href="http://www.bloggertrix.com/"><img src="http://icons.iconarchive.com/icons/artbees/social-networks-pro/64/StumbleUpon-icon.png" /></a></li>
<li><a href="http://www.bloggertrix.com/"><img src="http://icons.iconarchive.com/icons/artbees/social-networks-pro/64/Facebook-icon.png" title="Add to Facebook" /></a></li>
<li><a href="http://www.bloggertrix.com/"><img src="http://icons.iconarchive.com/icons/artbees/social-networks-pro/64/Digg-icon.png" title="Add to Digg" /></a></li>
<li><a href="http://www.bloggertrix.com/"><img src="http://icons.iconarchive.com/icons/artbees/social-networks-pro/64/Twitter-icon.png" title="Add to Twitter" /></a></li>
</ul>

6. If you want Change above Red color URL with Your Icon URL

7.Now you can add this to your page.thanks.
Read More

Wednesday, April 20, 2011

10 Blogger tools for bloggers

 When we doing blogging. we have to use many more tools
for different different works.If we search on the Google search
 we can find various category of tools. I have some collection
 of  tools site.its really helpful for blogger.i thought to share
with you.

blogger-tools,bloggertricks,blogging,tools for blogger

1.  blogflux.com
This is providing you everything you need to get your blog up and running. From a blog directory, to themes, stat tracking, and advanced services like our poll and quiz makers, Blogflux is the only resource you need to get your blog online

2. htmlkit.com
If you want to make favicon. It helps to make favicon by image.(Add favicon to your blog.)

3.feedburner.com
This helps to add Rss feed feature to your blog.

4 .flickr.com
Good place to share ans store your images.almost certainly the best online photo management and sharing application in the world

5. backpackit.com
Best place to  organizetodo, note,remindersand list easily and keep one place all the time.

Picasa is free photo editing software from Google that makes your pictures look great.
Sharing your best photos with friends and family is as easy as pressing a button!

7. gabbly.com
Live chat site for blogger. easy to chat with others


8. talkdigger.com
you can join this site and follow others and start conversation

9. tinyurl.com
make your URL tiny. its really helpful

10. swicki.eurekster.com
new type of search engine for web community.it combine with wiki .

Enjoy with it.
Read More

Tuesday, April 19, 2011

Extended Blogger Template

Extended Blogger Template 

Extend template,bloggertrix


 Template Name : Extended Blogger Template

 Template Author : www.freecsstemplates.org
        
 Designer :freecsstemplates

 Basic Instructions : How to install a Blogger template

 Descriptions :2 columns layout- left  Sidebar-About me-categories- blog Achieve - Navigation Menu- Top Search- RSS, Twitter Widgets- comments- fixed width- Widget Ready-Nice header color for contents-My Blog List-Search-green background.


Read More

How to make dynamic floating social bookmark

How to make dynamic floating social bookmark 

Bookmark,Facebook,twitter,floating
1. Log in to blogger account and Go to Design >Edit HTML

2. Put checked marked in Expand Widget Templates

3. Find this tag by using Ctrl+F    </head>

4. Paste below code after </head> tag

<script src='http://ajax.googleapis.com/ajax/libs/jquery/1.3.2/jquery.min.js' type='text/javascript'/> 

<script language='javascript'> 

var name = &quot;#floatMenu&quot;;

var menuYloc = null;

$(document).ready(function(){

menuYloc = 

parseInt($(name).css(&quot;top&quot;).substring(0,$(name).css 
(&quot;top&quot;).indexOf(&quot;px&quot;)))

$(window).scroll(function () { 

offset = menuYloc+$(document).scrollTop()+&quot;px&quot;;

$(name).animate({top:offset},{duration:1000,queue:false});

});

}); 

</script>

5. After Find this tagby using Ctrl+F    ]]></b:skin>

6. Paste below code before  ]]></b:skin>  tag

#floatMenu {

position:absolute;

top:150px;

float:left;

width:45px;}

#floatMenu ul {

list-style: none;}

#floatMenu ul li a {

-webkit-transform:scale(0.6);

-moz-transform:scale(0.6);

-o-transform:scale(0.6);

-webkit-transition-duration: 0.5s;

-moz-transition-duration: 0.5s;

-o-transition-duration: 0.5s;

opacity: 0.8;}

#floatMenu ul li a:hover {

-webkit-transform:scale(1);

-moz-transform:scale(1);

-o-transform:scale(1);

opacity: 1;}

5. After Find this tagby using Ctrl+F    </body>

6. Paste below code before  </body>  tag

<div id='floatMenu'>

<ul>

<li><a href='http://www.facebook.com/pages/Blogger-Trix/110888928990749'
 rel='nofollow' target='_blank'><img border='0' 
src='http://lh3.ggpht.com/_-kiN_mt1trA/TRGYfxUq9LI/AAAAAAAAACs/tzNEyscBX_I/btn_f.png'
 style='margin-bottom: 3px;' title='Follow Me On 
Facebook'/></a></li>

<li><a href='http://twitter.com/bloggertrix'
 rel='nofollow' target='_blank'><img border='0' 
src='http://lh5.ggpht.com/_-kiN_mt1trA/TRGYf-CYBHI/AAAAAAAAACw/tuuYnz20Lx0/btn_t.png'
 style='margin-bottom: 3px;' title='Follow Me On 
Twitter'/></a></li>

</ul>

</div>

Note: Replace http://twitter.com/bloggertrix with your Twitter profile link
          Replace http://www.facebook.com/pages/Blogger-Trix/110888928990749
          with facebook fan page link.

7.Your are done.
Read More

Sunday, April 17, 2011

How to make Drop down menu for blogger

How to make Drop down menu for blogger


This will helps you to arrange your page space.you can add
more link on drop down menu.its easy  try it. it will  helpful
 to you. ill give example  how to make it.
you can add it to add gadget. follow these steps.

1. Log in to your blogger account and Go to Design >>page Element

2.Click Add gadget and Select HTML/JavaScript 

3. Now paste paste below code

<form><select name="menu" onchange="window.open 
(this.options[this.selectedIndex].value,'_blank')" size="1" 
style="width:200px">

<option> -Best Blogger Trcks - </option>
<!-- change the links with your own -->
<option value="http://www.bloggertrix.com/">Blogger Trix</option>
<option value="http://twitter.com/soharox">Twitter Follower</option>
<option value="http://www.facebook.com/pages/Blogger-Trix/110888928990749">Be a Facebook fan</option>

</select></form>

Note: Replace 200 width with your  like
          Change URL as your like

4. Now save  HTML/JavaScript  

   you are done.
Read More

How to add Image Zoom Hover Effect to blogger

 How to add Image Zoom Hover Effect to blogger


1. Log in to your blogger account and Go to Design >> Edit HTML

2. Put checked marked in Expand Widget Templates

3. Find this tag by using Ctrl+F 


4. Paste below code before ]]></b:skin> tag


/*URL: http:www.bloggertrix.com */
.hovergallery img{
-webkit-transform:scale(0.8); 
-moz-transform:scale(0.8); 
-o-transform:scale(0.8); 
-webkit-transition-duration: 0.5s; 
-moz-transition-duration: 0.5s; 
-o-transition-duration: 0.5s; 
opacity: 0.7; 
margin: 0 10px 5px 0;
}

.hovergallery img:hover{
-webkit-transform:scale(1.1);
-moz-transform:scale(1.1); 
-o-transform:scale(1.1); 
opacity: 1;
}

Now you can add this zoom hover for your image. ill give a example to do this

5. Click on "Posting" >> "New Post" and  go to edit HTML


<a class="hovergallery" href="http://www.bloggertrix.com" target="_blank">
<img src=" http://1.bp.blogspot.com/_XoMK3ToWnac/TOnzgjW6lgI
/AAAAAAAAAOg/ZjqasXcFpxo/s1600/blogger.jpg" /></a>


*Replace  http://www.bloggertrix.com  with your link
*Replace  http://1.bp.blogspot.com/_XoMK3ToWnac/TOnzgjW6lgI
/AAAAAAAAAOg/ZjqasXcFpxo/s1600/blogger.jpg with image URL

6. Now you can click publish post and enjoy with Zoom image hover
Read More

Saturday, April 16, 2011

Video Blogger Template

Video Blogger Template


 Template Name : Video Blogger Template

 Template Author : www.freebloggertemplate.info
        
 Designer : templatic

 Basic Instructions : How to install a Blogger template

 Descriptions :2 columns layout-wide footer-recent videos-Right Sidebar-Navigation Menu- Navigation Menu-  Search Box Ready- RSS, Twitter Widgets- comments - Widget Ready-
My Blog List-Search-Top Commentators


Read More

How to make image hover (mouse over button)

How to make image hover (mouse over button)


Image hover is a mouse over button. when you move
courser to button,you will see some animate on there.
you have to use two image for this.lets try it.

Image 1


Image 2


1. Log in to your blogger account and Go to "Posting" >> "New Post"

2.  Paste below code


<a href="http://www.bloggertrix.com/">
<img src="http://i530.photobucket.com/albums/dd341/herrolim/donlot.png" 
onmouseover="this.src='http://i530.photobucket.com/albums/dd341/herrolim/donlotOver.png';" 
onmouseout="this.src='http://i530.photobucket.com/albums/dd341/herrolim/donlot.png';" /></a>

3. you can change http://www.bloggertrix.com/ with your link

done.


Read More

How to highlight code to any script, text in the post

How to highlight code to any script, text in the post


1. Log in to blogger account and Go to Design > Edit HTML

2. Put checked marked in Expand Widget Templates

3. Find this tag by using Ctrl+F 


4. Paste below code before ]]></b:skin> tag

.alert { background: #DDE4FF;

text-align: left;

padding: 5px 5px 5px 5px;

border-top: 1px dotted #223344;border-bottom: 1px dotted 
#223344;border-left: 1px dotted #223344;border-right: 1px dotted 
#223344;}
/* www.bloggertrix.com */

5. Click on "Posting" >> "New Post" and  go to edit HTML and paste this tag
   <div class="alert">  beginning of the text you want to highlight 

6. After you can type code or script or text.  after it you have to
     paste </div>  for closing div tag (don't forget to do it. it won,t work)

7. After you can save and check it. good luck, its easy.
    Note: you can change #DDE4FF with any color code.

Read More

Friday, April 15, 2011

WPPremiumBrown Blogger Template

 WP PremiumBrown Blogger Template


 Template Name : WPPremiumBrown Blogger Template

 Template Author : www.bloggertemplatesfree.com
        
 Designer : bloggertemplatesfree

 Basic Instructions : How to install a Blogger template

 Descriptions : 3 columns layout- Right Sidebar-Recent Posts - Navigation Menu- Top Navigation Menu-  Search Box- RSS, Twitter Widgets- comments- fixed width- Widget Ready-My Blog List-Search-wide header


Read More

Box Tube Blogger Template

Box Tube Blogger Template


 Template Name : Box Tube Blogger Template

 Template Author : www.bloggertemplatesfree.com
        
 Designer : bloggertemplatesfree

 Basic Instructions : How to install a Blogger template

 Descriptions :2 columns layout- Right Sidebar-Recent Posts - Navigation Menu- Top Navigation Menu-  Search Box Ready- RSS, Twitter Widgets- comments- fixed width- Widget Ready-My Blog List-Search-
Top Commentators

Read More

Majestic Blogger Template

Majestic Blogger Template


 Template Name : Majestic Blogger Template

 Template Author : www.bloggertemplatesfree.com
        
 Designer : bloggertemplatesfree

 Basic Instructions : How to install a Blogger template

 Descriptions :2 columns layout- Right Sidebar-Recent Posts - Navigation Menu- Top Navigation Menu-  Search Box Ready- RSS, Twitter Widgets- Gravatar on comments- fixed width- Widget Ready-Recent Posts

Read More

Soul Vision Blogger Template

Soul Vision Blogger Template 


 Template Name : Commerce Blogger Template

 Template Author : www.bloggertemplatesfree.com
        
 Designer : bloggertemplatesfree

 Basic Instructions : How to install a Blogger template

 Descriptions :Right Sidebar-Recent Posts - Top Navigation Menu- 2 columns layout Search Box Ready- Ready Social Widgets- RSS, Twitter Widgets- Gravatar on comments- fixed width- Widget Ready-Recent Posts-Wide footer ad wide header.

Read More

Thursday, April 14, 2011

Minyx Blogger Template

Minyx  Blogger Template


 Template Name : Minyx Blogger Template

 Template Author : www.btemplates.com
        
 Designer : BTemplates

 Basic Instructions : How to install a Blogger template

 Descriptions : with 2 columns and right sidebar.Excellent layout for blogs about business or culture.

Read More

Wednesday, April 6, 2011

How to make animate Category links to blogger


You can make your category as link animation.

1. Log in to your blogger account and Go to Design >> Edit HTML

2. Put checked marked in Expand Widget Templates

3. Find this tag by using Ctrl+F  </head>
 
4. Paste below code before </head> tag

<script src='http://ajax.googleapis.com/ajax/libs/jquery/1.5.1/jquery.min.js' type='text/javascript'>
</script>
<script type='text/javascript'>
    var dur = 400; // Duration Of Animation in Milli Seconds
    $(document).ready(function() {
        $('a.linknudge, .Label ul li a').hover(function() {
            $(this).animate({
                paddingLeft: '25px'
            }, dur);
        }, function() {
            $(this).animate({
                paddingLeft: 0
            }, dur);
        });
    }); // end of Jquery Script</script>/* www.bloggertrix.com */

5. Now click preview and click save template. you are done.
Read More